
You can download all project files here.
These are the instructions to hack the servos and below you can see the electrical links.

After the program upload into the Arduino yùn you have to open the REST API ACCESS from the configuration menù.

At this point you are able to open the rover web page with a tablet or a PC linked on the same net.
You have to write the Arduino yùn IP plus "/sd/rover" on the web browser address bar.
For example my address is:
http://192.168.1.36/sd/rover/
And the WEB ROVER page will come up.
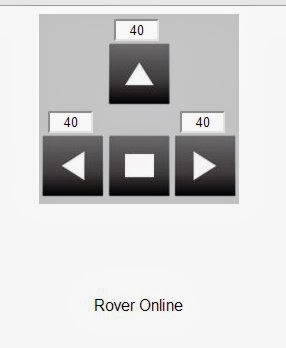
The WEB ROVER page has some buttons to controll the rover and a status field. Numeric values are used to set the number of Arduino cycles during which the command will be executed. This meaning that with a 50 ms of loop delay, each command will be executed for 2 seconds.
This is a security function to avoid problems. In this way the rover stop it if the ethernet connectios fails.
In the next version I'm going to add an automatic control connection protocol.
The HTML code is mainly formed by two side:
- a table with the buttons icons and some numeric field.
- 4 javascript functions. Two to send command and two to receive informations from the rover.
<input type="text" style="text-align: center" size="2" name="timeL" value="40" id="timeL" /><br>
<img src="left.jpg" id="timeLimage" onclick="sendCommand(3,document.getElementById('timeL').value);"/>
When you press a buttont, the send Command function will be executed. This function has two parameters, the 3 and the 40 for text value
function sendCommand(mode,time)
{
document.getElementById("info").innerHTML = "sent command >>>";server = "/arduino/mode/" + mode + "/" + time;
richiesta = new XMLHttpRequest();
richiesta.onreadystatechange = sendCommandResponse;
richiesta.open("GET", server, true);
richiesta.send(null);
}
The sendCommand function send a HttpRequest (it's like write an address on a web browser and press enter) with address: IP/arduino/mode/3/40.
Thanks to web server and bridge library the Arduino sketch catch the string and from the string it get the numbers 3 and 40.
The code "richiesta.onreadystatechange = sendCommandResponse;" subscribes the answer from Arduino and tell that it will be managed by "sendCommandResponse" function.
The code "richiesta.onreadystatechange = sendCommandResponse;" subscribes the answer from Arduino and tell that it will be managed by "sendCommandResponse" function.
function sendCommandResponse()
{
if ((richiesta.readyState == 4) && (richiesta.status == 200)){
esito = richiesta.responseText;
document.getElementById("info").innerHTML = esito;
response = esito.split("#");
document.getElementById("info").innerHTML = response;
mode = response[0];
Ardumia67timeout = response [1];
}
}
That function "sendCommandResponse" refresh the string state field.
In the next post I'm going to add a webcam to the rover.
No comments:
Post a Comment